> ## Documentation Index
> Fetch the complete documentation index at: https://help.goodnative.co/llms.txt
> Use this file to discover all available pages before exploring further.
# Quick start guide
> Install Bloom on Shopify, enable the theme embed, match your brand styles, and configure pre-order and Notify Me products in under 10 minutes.
Bloom adds variant-level **Pre-order** and **Notify Me** to your store - no theme-file edits. New here? Start with the [Overview](/bloom/overview). This guide gets you live in under 10 minutes.
By the end your store will show Pre-order and Notify Me on the products you choose when stock hits zero.
## In a nutshell
1. Enable Bloom in your theme
2. Style and customise messaging
3. Pre-order Configure products you want on pre-order
4. Notify Me Connect Klaviyo and set up the back-in-stock flow
**Before you begin**
* Shopify 2.0 Theme (some 1.0 themes are also compatible)
* Admin access to edit your theme
* Notify Me: A Klaviyo account
## Quick start walk-through
## Follow the in-app setup guide
The Bloom home page (**Apps → Bloom**) is the easiest way to work through setup. It shows three tiles - **Core**, **Pre-order**, and **Notify Me** - each with a status badge, expanding into the steps below.
* Steps tagged **Auto-detected** tick themselves off as Bloom detects them; the rest you tick off as you go.
* Optional steps are tagged - the product page block, for example, is **Only if needed**.
* Each step's button deep-links straight to the right screen in Shopify admin.
* Once a feature is live, its tile shows live stats (variants on pre-order, sign-ups) instead of setup steps, and the home page shows your [Results](/bloom/results).
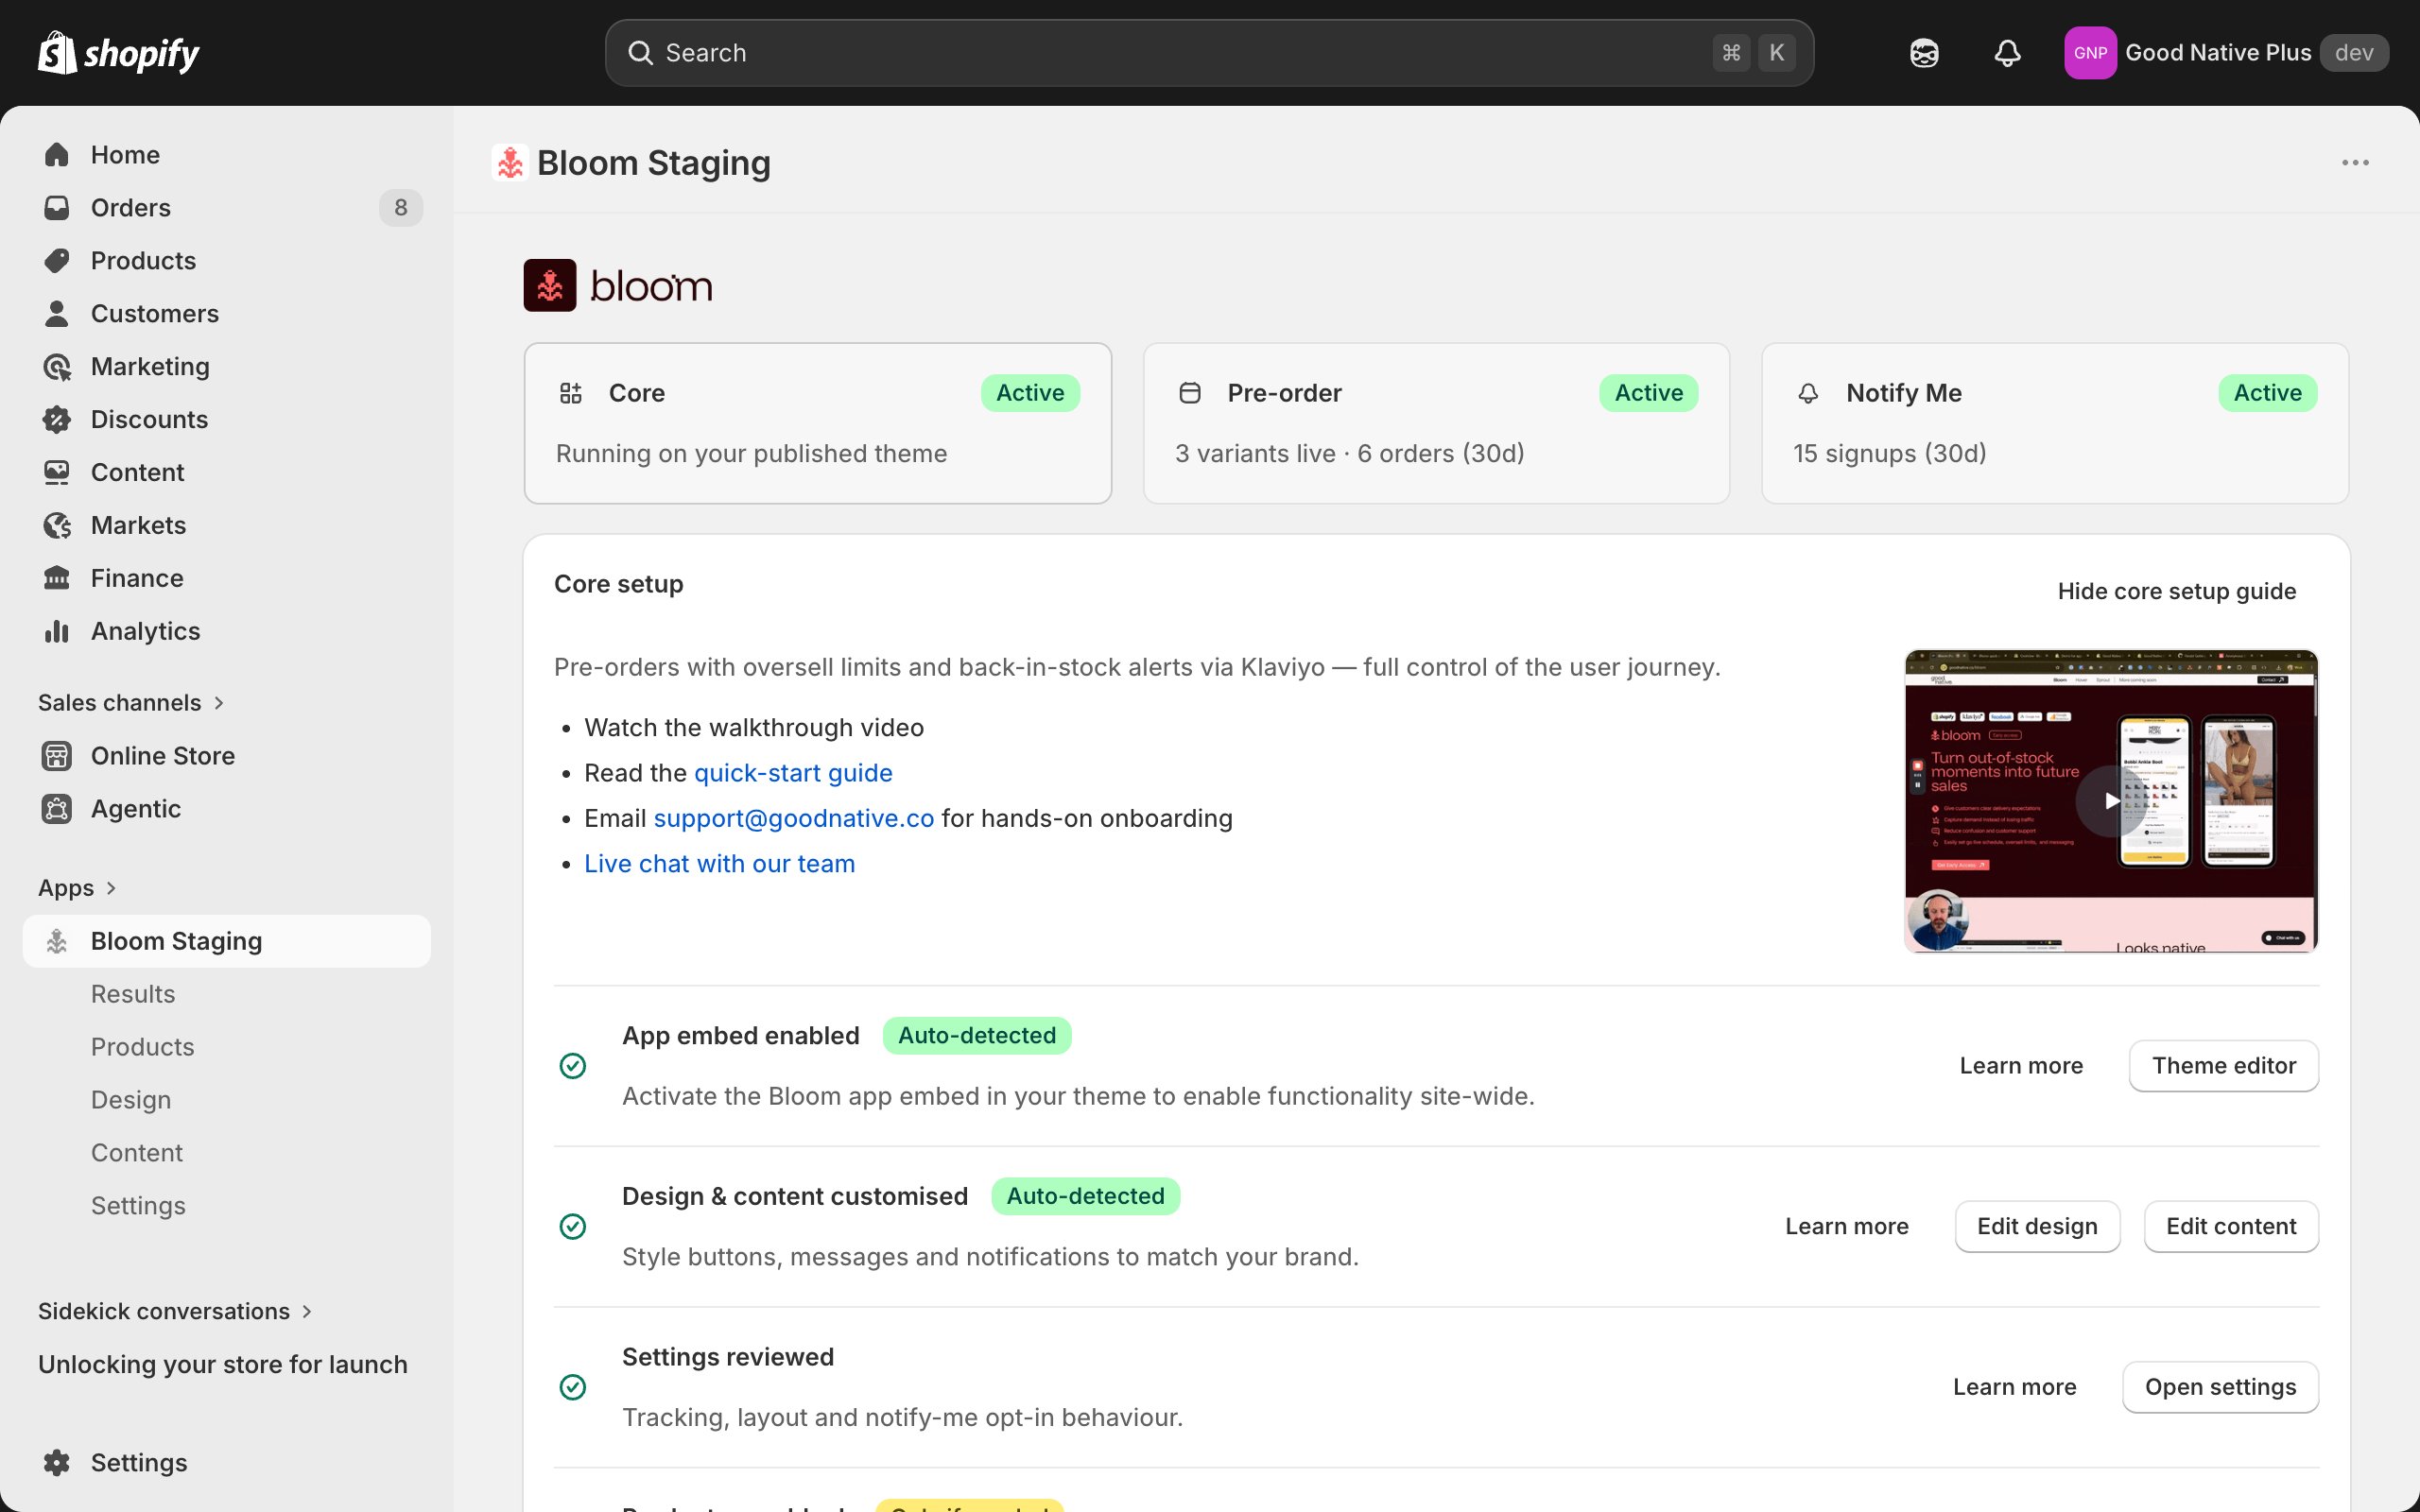 The rest of this page walks through the same steps in detail.
## 1. Enable Bloom in your theme
Enabling the Bloom app embed is the only theme change required. The pre-order message and Notify Me form auto-inject next to your **Add to cart** button on every product page.
1. From Shopify admin, go to **Online Store → Themes**.
2. On your live theme click **Customise**.
3. Open the **App embeds** panel (the puzzle-piece icon in the left sidebar).
4. Toggle **Bloom** on.
5. Click **Save**.
The rest of this page walks through the same steps in detail.
## 1. Enable Bloom in your theme
Enabling the Bloom app embed is the only theme change required. The pre-order message and Notify Me form auto-inject next to your **Add to cart** button on every product page.
1. From Shopify admin, go to **Online Store → Themes**.
2. On your live theme click **Customise**.
3. Open the **App embeds** panel (the puzzle-piece icon in the left sidebar).
4. Toggle **Bloom** on.
5. Click **Save**.
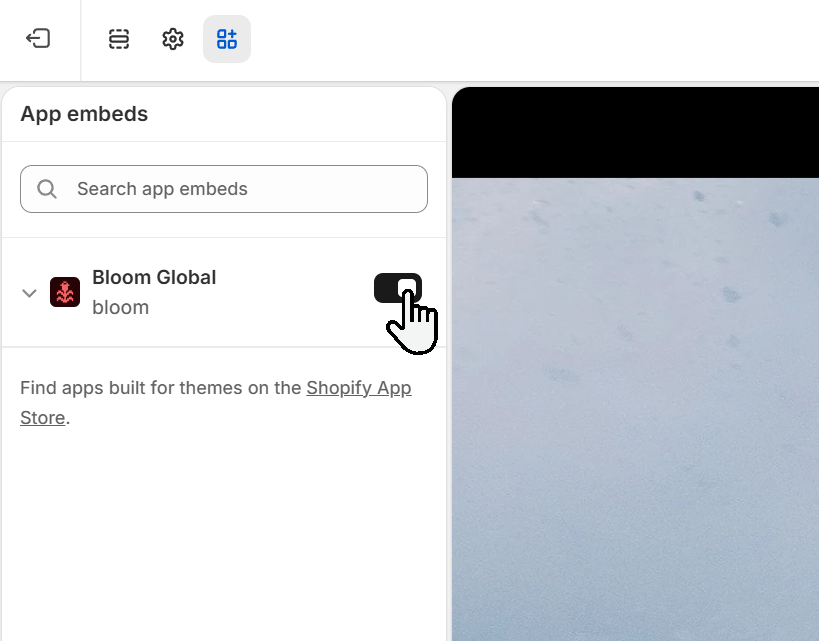 From inside Bloom, the **Theme editor** button on the setup guide opens this screen with the Bloom embed pre-activated - just save.
We recommend **disabling instant checkout** (Shop Pay, Google Pay, and other dynamic checkout buttons on the product page) for pre-order products. Instant checkout skips the cart, so shoppers miss the pre-order line item message and cart messaging that explains what they're agreeing to.
### Product page block
Most themes need nothing more than the app embed. Add the **Bloom Product** block to your product template only if:
* The pre-order button flickers or doesn't appear on your theme.
* You want per-template, market or locale overrides.
See [Add the Bloom Product block](/bloom/pdp-block).
## 2. Design & messaging
Style buttons and messaging on PDP and cart to match your brand.
1. In Shopify admin, open **Apps → Bloom**.
2. Go to **Design**.
3. Adjust button & text styles, colours, borders, sizing, etc. The **live preview** alongside the controls updates as you edit - switch it between pre-order, sold-out and notify-me states to check every surface.
4. Click **Save**.
From inside Bloom, the **Theme editor** button on the setup guide opens this screen with the Bloom embed pre-activated - just save.
We recommend **disabling instant checkout** (Shop Pay, Google Pay, and other dynamic checkout buttons on the product page) for pre-order products. Instant checkout skips the cart, so shoppers miss the pre-order line item message and cart messaging that explains what they're agreeing to.
### Product page block
Most themes need nothing more than the app embed. Add the **Bloom Product** block to your product template only if:
* The pre-order button flickers or doesn't appear on your theme.
* You want per-template, market or locale overrides.
See [Add the Bloom Product block](/bloom/pdp-block).
## 2. Design & messaging
Style buttons and messaging on PDP and cart to match your brand.
1. In Shopify admin, open **Apps → Bloom**.
2. Go to **Design**.
3. Adjust button & text styles, colours, borders, sizing, etc. The **live preview** alongside the controls updates as you edit - switch it between pre-order, sold-out and notify-me states to check every surface.
4. Click **Save**.
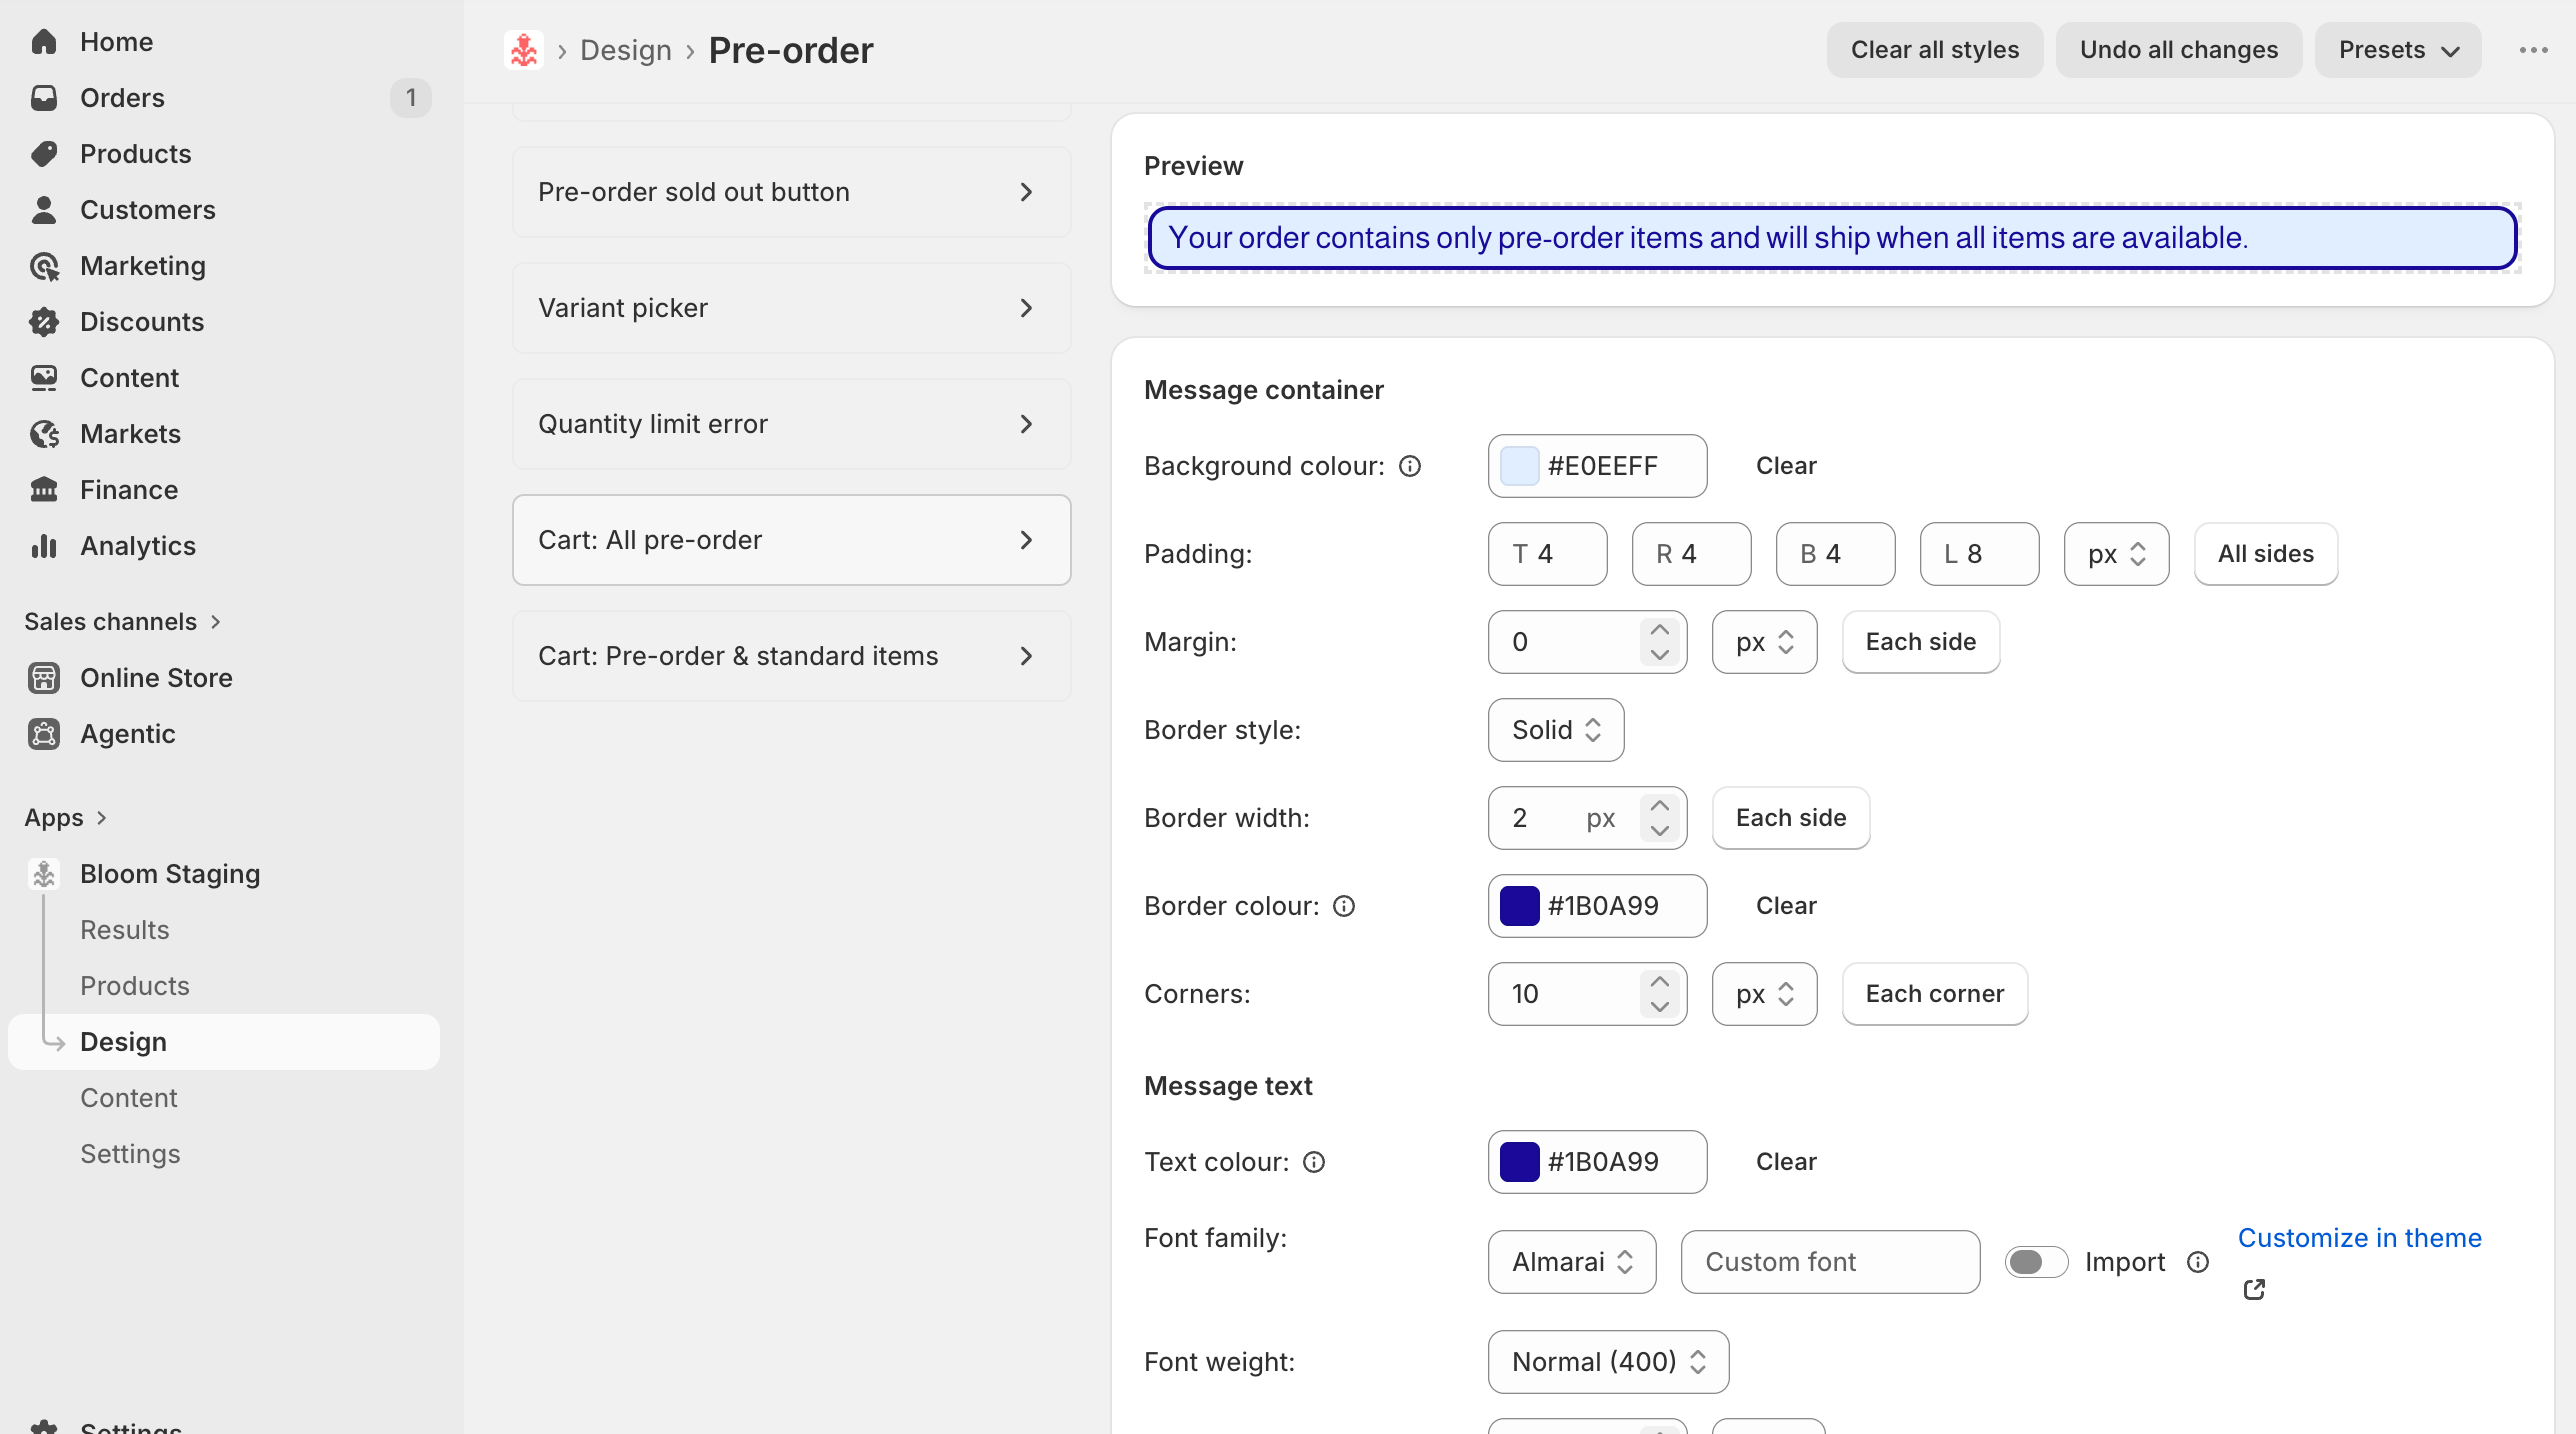 Pre-order and Notify Me appear below the Add to cart button and at the bottom of the cart; Notify Me is a form by default. Change where the pre-order message sits in [Pre-order settings](/bloom/pre-order/settings#message-placement), and the Notify Me layout in [Notify Me settings](/bloom/notify-me/settings#display-mode).
Configure your language on the product page & cart.
1. In Shopify admin, open **Apps → Bloom**.
2. Go to **Content**.
3. Adjust **default messaging** for each placement.
4. Click **Save**.
You can tailor messaging on specific templates, locales or markets by using the Bloom blocks in your theme customiser. See [Tailor template, market or locale](/bloom/theme-template-and-locale-overrides).
Pay special attention to the cart language for orders that have pre-order & in stock items. Do you deliver all items when pre-ordered items become available, or split into two orders? See [Split orders](/bloom/pre-order/split-orders).
## 3. Configure products
You can bulk update pre-order and Notify Me settings for products and variants with a high level of granular control.
* **Pre-order**: Shows when a variant has pre-order enabled, has an oversell limit, and is out of stock.
* **Notify Me**: Shows on any out-of-stock variant, unless disabled.
Pre-order and Notify Me appear below the Add to cart button and at the bottom of the cart; Notify Me is a form by default. Change where the pre-order message sits in [Pre-order settings](/bloom/pre-order/settings#message-placement), and the Notify Me layout in [Notify Me settings](/bloom/notify-me/settings#display-mode).
Configure your language on the product page & cart.
1. In Shopify admin, open **Apps → Bloom**.
2. Go to **Content**.
3. Adjust **default messaging** for each placement.
4. Click **Save**.
You can tailor messaging on specific templates, locales or markets by using the Bloom blocks in your theme customiser. See [Tailor template, market or locale](/bloom/theme-template-and-locale-overrides).
Pay special attention to the cart language for orders that have pre-order & in stock items. Do you deliver all items when pre-ordered items become available, or split into two orders? See [Split orders](/bloom/pre-order/split-orders).
## 3. Configure products
You can bulk update pre-order and Notify Me settings for products and variants with a high level of granular control.
* **Pre-order**: Shows when a variant has pre-order enabled, has an oversell limit, and is out of stock.
* **Notify Me**: Shows on any out-of-stock variant, unless disabled.
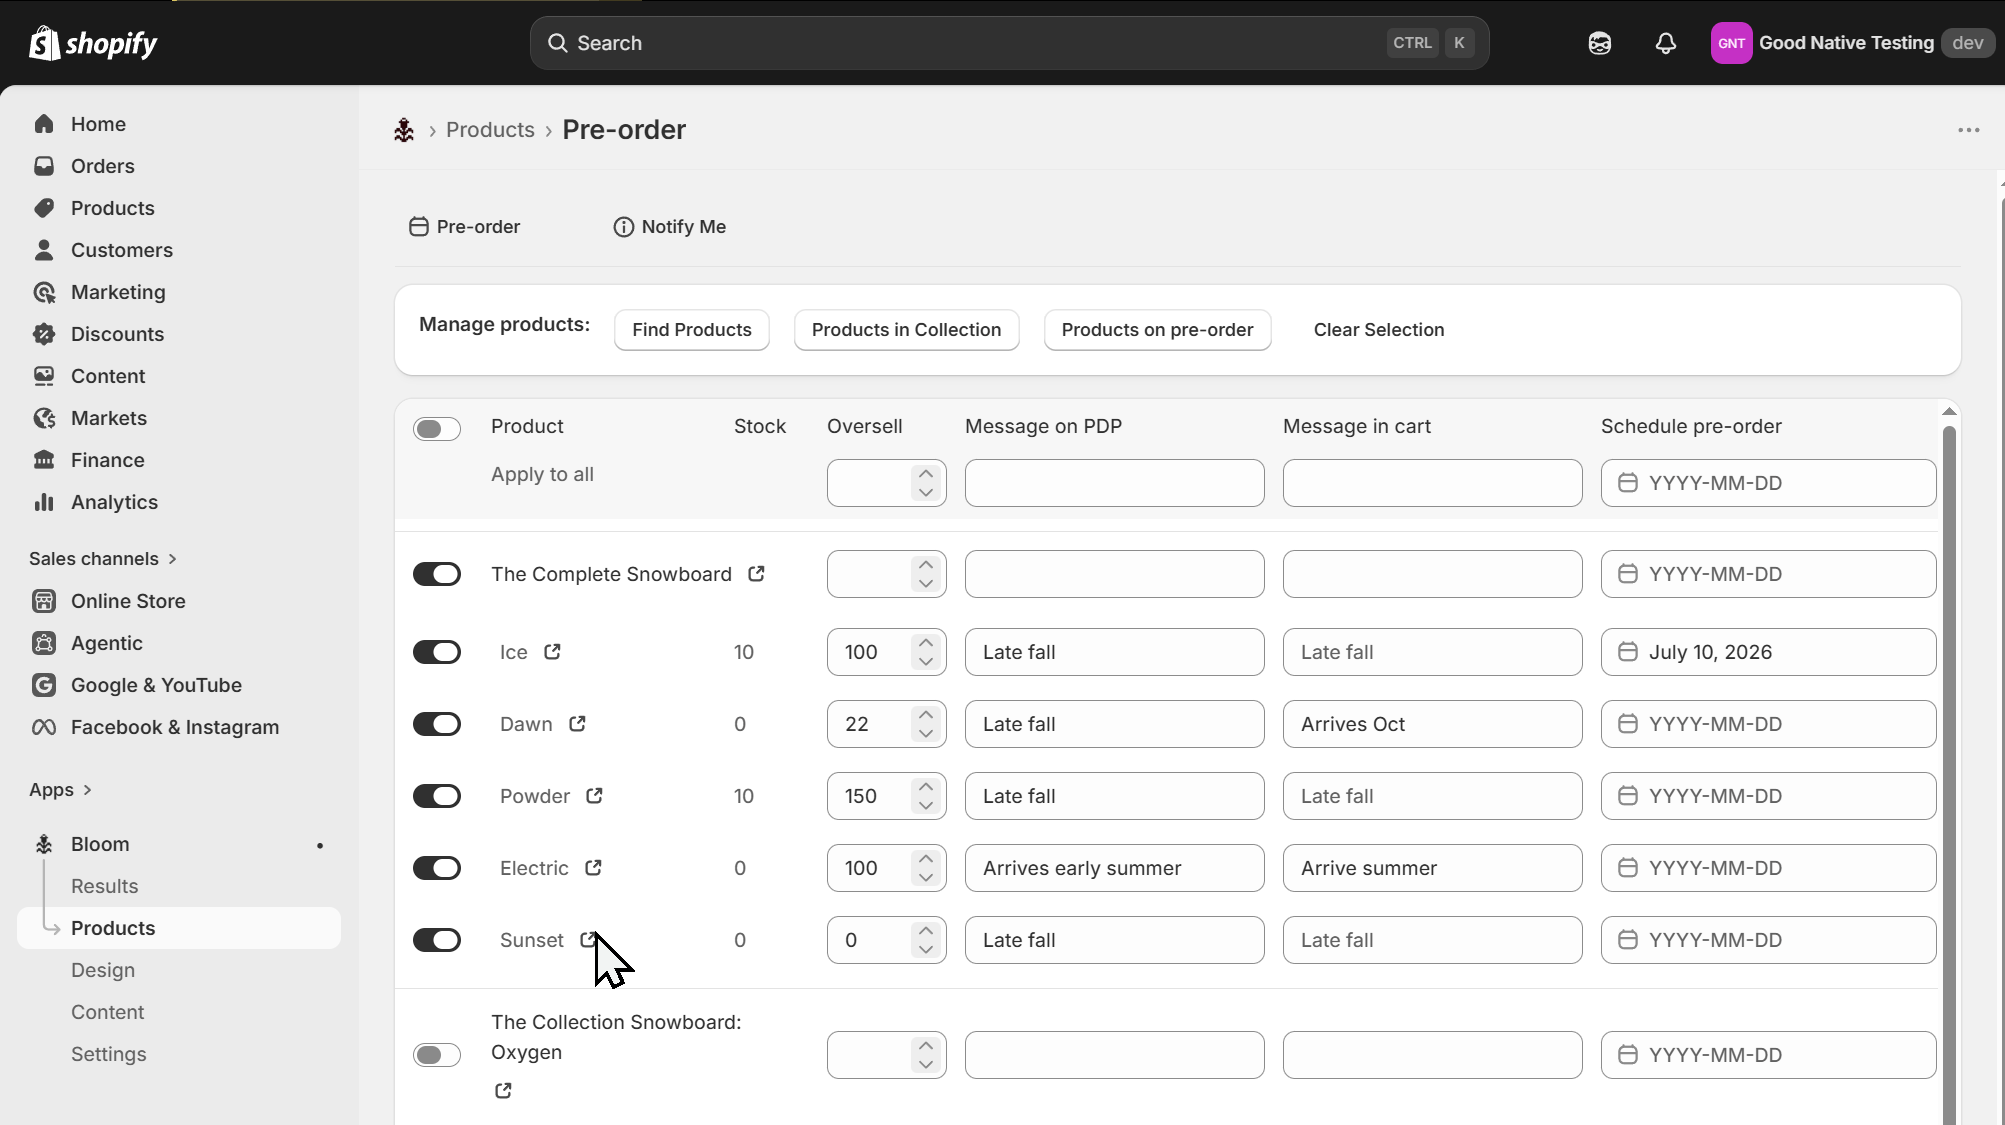 1. In Shopify admin, open **Apps → Bloom**.
2. Go to **Products**.
3. **Find the product or collection** of products you'd like to update.
4. In bulk update the full list, individual products or individual variants.
5. You can enable / disable, change messaging, set oversell limits or schedule when the pre-order feature should start.
* [Configure a Pre-order product](/bloom/pre-order/product-config)
* [Configure a Notify Me product](/bloom/notify-me/product-config)
* [Disable Notify Me on a product](/bloom/notify-me/disable)
* [Schedule a Pre-order](/bloom/pre-order/schedule)
6. Click **Save**.
The **Message in cart** you set on each variant also shows on the checkout page (Shopify Plus), the Thank you page, and the customer's order status page - see the next section.
## 4. Pre-order Show pre-order info during and after checkout
Bloom ships three customer-facing blocks beyond the product page:
| Surface | Block | Notes |
| --------------------- | ------------------------------- | -------------------------------------------------------------------------------- |
| **Checkout page** | *Bloom Pre-order Banner* | Shopify Plus only - Shopify gates the checkout editor for Plus stores. |
| **Thank you page** | *Bloom Pre-order Banner* | Shown immediately after a successful order. |
| **Order status page** | *Bloom: Pre-order Order Status* | Per-line, with a *Last updated* tag if the ship date has changed since purchase. |
**Where the copy comes from:**
* Banner text on Checkout and Thank you: **Apps → Bloom → Content → Pre-order → Checkout banner**.
* Per-line text on Order status: each variant's **Message in cart**.
Change a variant's **Message in cart** after orders are placed and the order status block updates automatically - see [Updating pre-order info on existing orders](/bloom/pre-order/updates).
### Add blocks to checkout, thankyou & order status
1. Open the relevant editor in Shopify admin (the setup guide's **Checkout**, **Thank you** and **Order status** buttons link straight there):
* **Checkout** and **Thank you**: **Settings → Checkout → Customize** (Shopify Plus).
* **Order status**: **Settings → Customer accounts → Customize**.
2. Switch to the page, click **Add app block**, pick the Bloom block.
1. In Shopify admin, open **Apps → Bloom**.
2. Go to **Products**.
3. **Find the product or collection** of products you'd like to update.
4. In bulk update the full list, individual products or individual variants.
5. You can enable / disable, change messaging, set oversell limits or schedule when the pre-order feature should start.
* [Configure a Pre-order product](/bloom/pre-order/product-config)
* [Configure a Notify Me product](/bloom/notify-me/product-config)
* [Disable Notify Me on a product](/bloom/notify-me/disable)
* [Schedule a Pre-order](/bloom/pre-order/schedule)
6. Click **Save**.
The **Message in cart** you set on each variant also shows on the checkout page (Shopify Plus), the Thank you page, and the customer's order status page - see the next section.
## 4. Pre-order Show pre-order info during and after checkout
Bloom ships three customer-facing blocks beyond the product page:
| Surface | Block | Notes |
| --------------------- | ------------------------------- | -------------------------------------------------------------------------------- |
| **Checkout page** | *Bloom Pre-order Banner* | Shopify Plus only - Shopify gates the checkout editor for Plus stores. |
| **Thank you page** | *Bloom Pre-order Banner* | Shown immediately after a successful order. |
| **Order status page** | *Bloom: Pre-order Order Status* | Per-line, with a *Last updated* tag if the ship date has changed since purchase. |
**Where the copy comes from:**
* Banner text on Checkout and Thank you: **Apps → Bloom → Content → Pre-order → Checkout banner**.
* Per-line text on Order status: each variant's **Message in cart**.
Change a variant's **Message in cart** after orders are placed and the order status block updates automatically - see [Updating pre-order info on existing orders](/bloom/pre-order/updates).
### Add blocks to checkout, thankyou & order status
1. Open the relevant editor in Shopify admin (the setup guide's **Checkout**, **Thank you** and **Order status** buttons link straight there):
* **Checkout** and **Thank you**: **Settings → Checkout → Customize** (Shopify Plus).
* **Order status**: **Settings → Customer accounts → Customize**.
2. Switch to the page, click **Add app block**, pick the Bloom block. 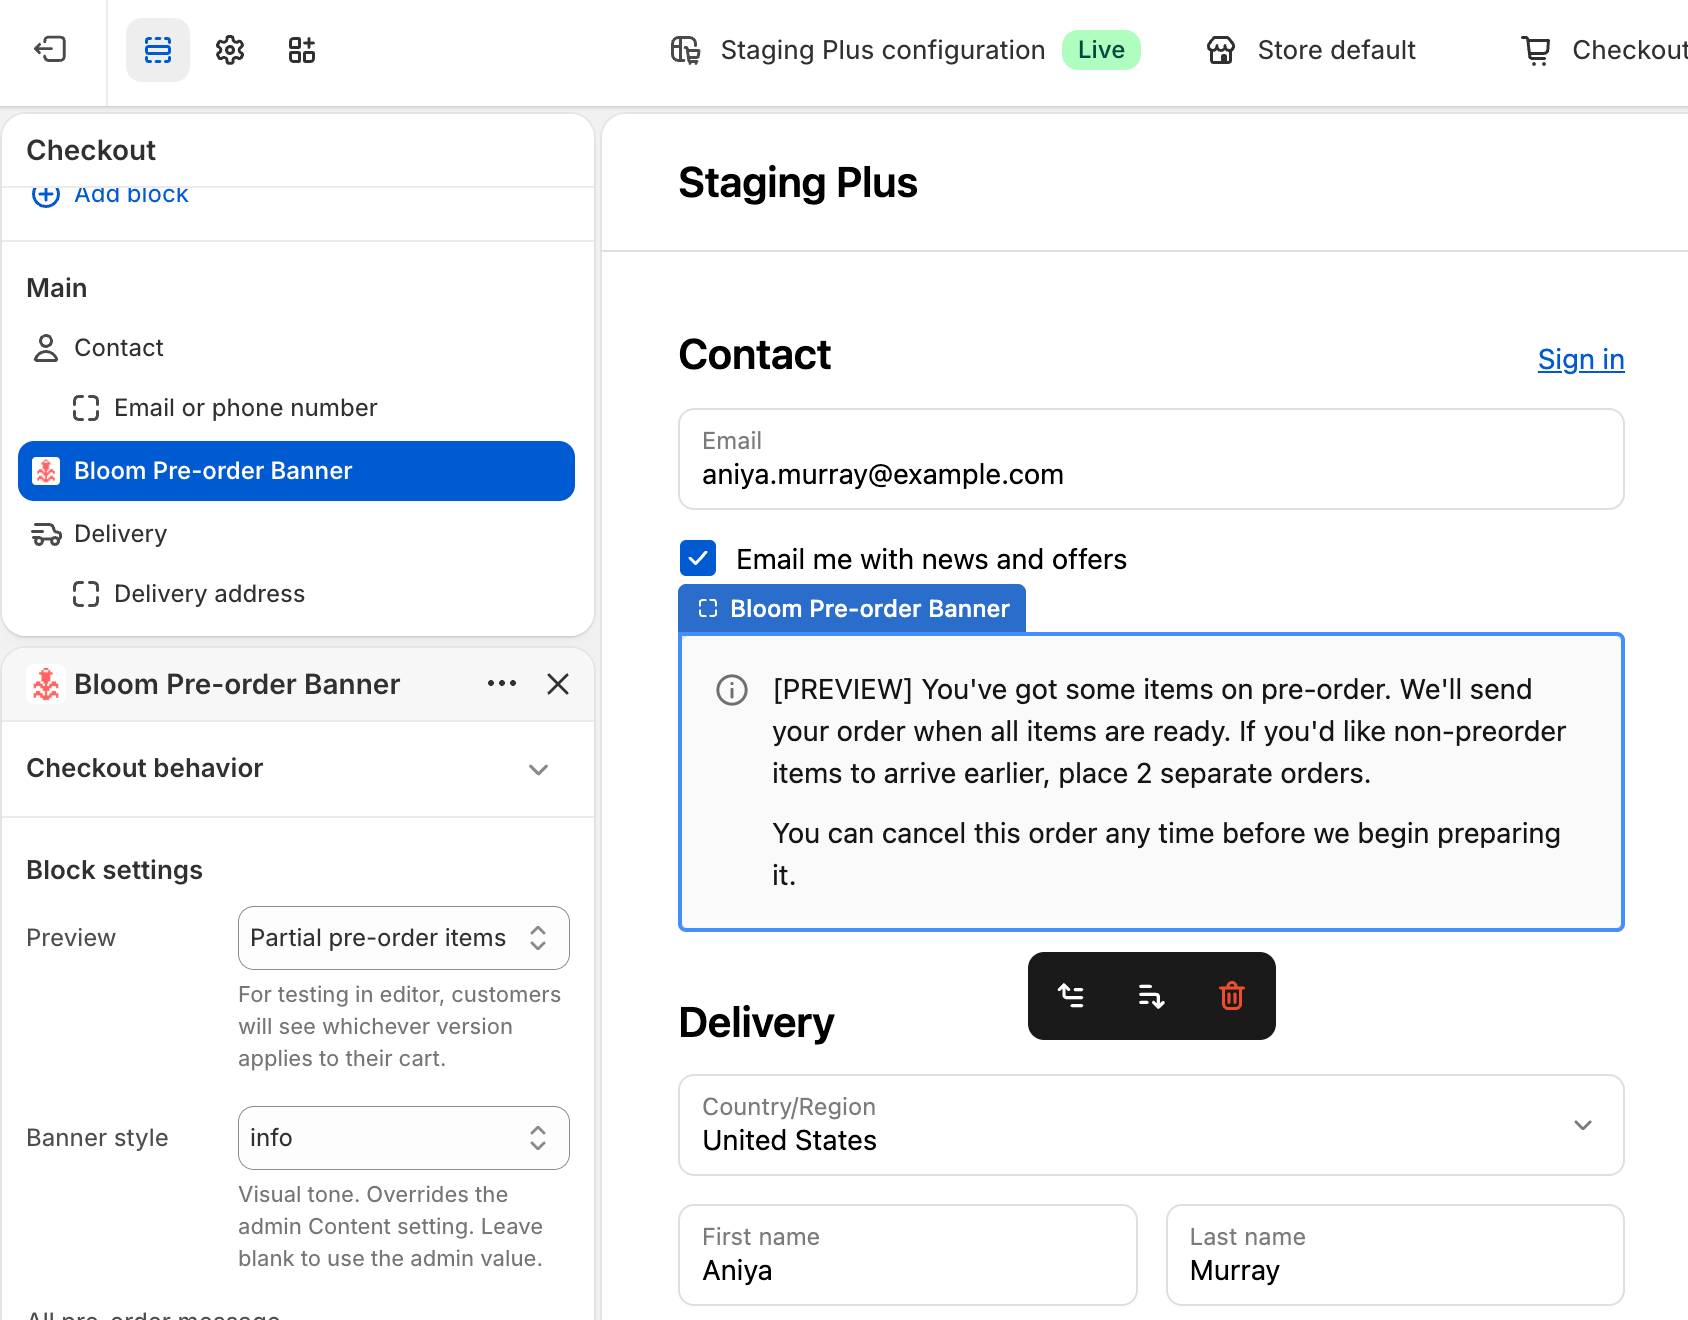 3. Click **Save**.
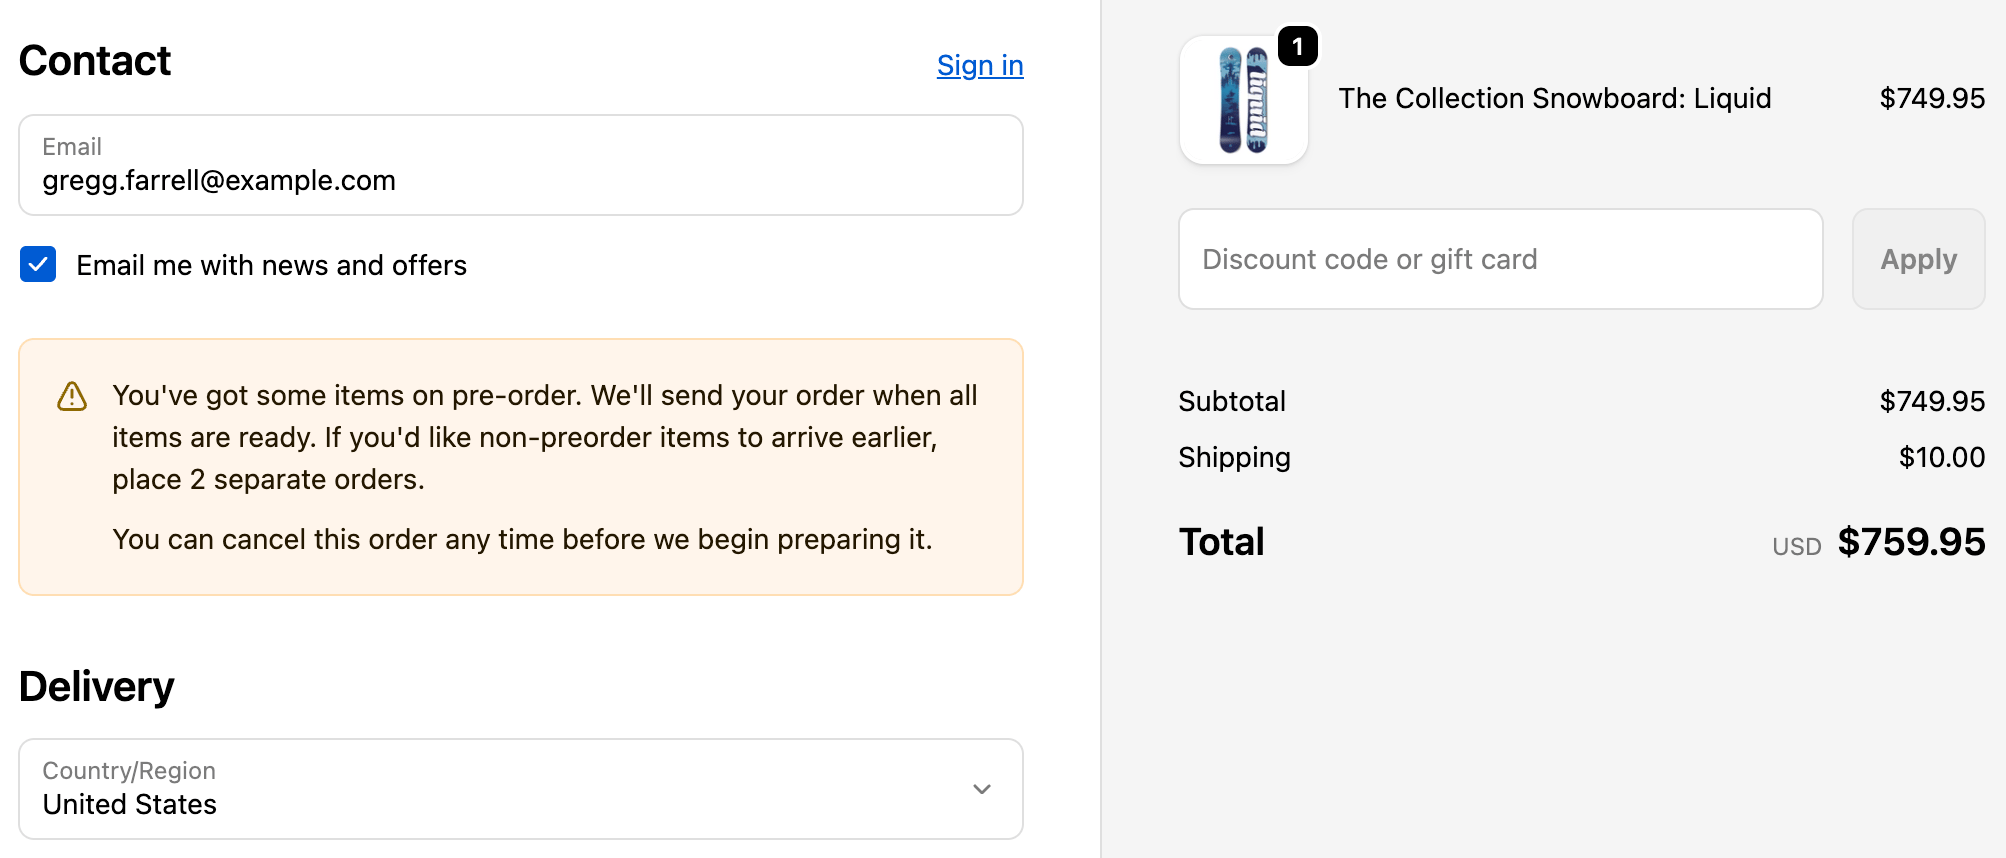 ## 5. Notify Me Connect Klaviyo
All email and SMS communications come from Klaviyo using their back-in-stock flows. To start capturing back-in-stock sign-ups, configure Notify Me settings. To start sending notifications, follow the [back-in-stock flow](/bloom/notify-me/flow) guide.
Copy your Klaviyo credentials into Bloom Settings. The Klaviyo List you use can be a dedicated back-in-stock list, or your standard newsletter list.
1. In Shopify admin, open **Apps → Bloom**.
2. Go to **Settings → Notify me → Klaviyo integration**.
3. Paste your **Company ID (Public API Key)** and **List ID**.
4. Click **Save**.
See [Connect Klaviyo](/bloom/notify-me/connect-klaviyo) for step-by-step instructions on finding your API Key and List ID inside Klaviyo.
## 5. Notify Me Connect Klaviyo
All email and SMS communications come from Klaviyo using their back-in-stock flows. To start capturing back-in-stock sign-ups, configure Notify Me settings. To start sending notifications, follow the [back-in-stock flow](/bloom/notify-me/flow) guide.
Copy your Klaviyo credentials into Bloom Settings. The Klaviyo List you use can be a dedicated back-in-stock list, or your standard newsletter list.
1. In Shopify admin, open **Apps → Bloom**.
2. Go to **Settings → Notify me → Klaviyo integration**.
3. Paste your **Company ID (Public API Key)** and **List ID**.
4. Click **Save**.
See [Connect Klaviyo](/bloom/notify-me/connect-klaviyo) for step-by-step instructions on finding your API Key and List ID inside Klaviyo.
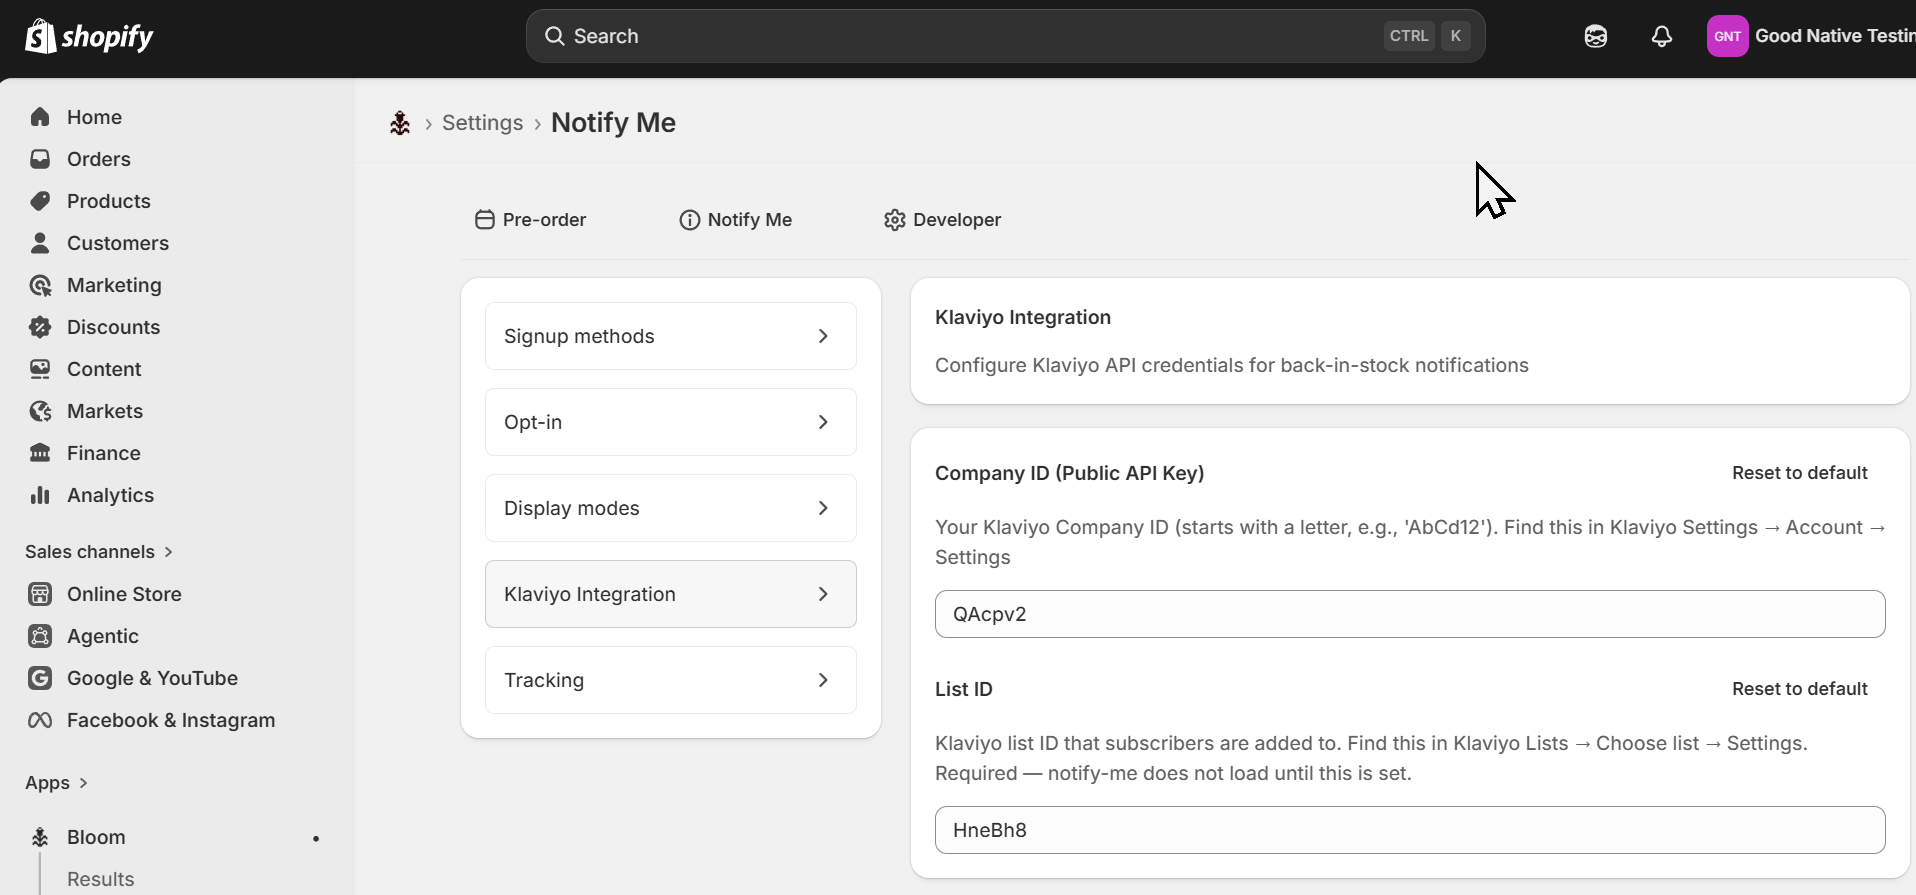 You will start receiving notify me sign-ups at this point.
Notify Me sign-ups are captured immediately, but no email or SMS goes out until this flow is live in Klaviyo.
Full walk-through: [Set up the back-in-stock flow](/bloom/notify-me/flow).
You will start receiving notify me sign-ups at this point.
Notify Me sign-ups are captured immediately, but no email or SMS goes out until this flow is live in Klaviyo.
Full walk-through: [Set up the back-in-stock flow](/bloom/notify-me/flow).
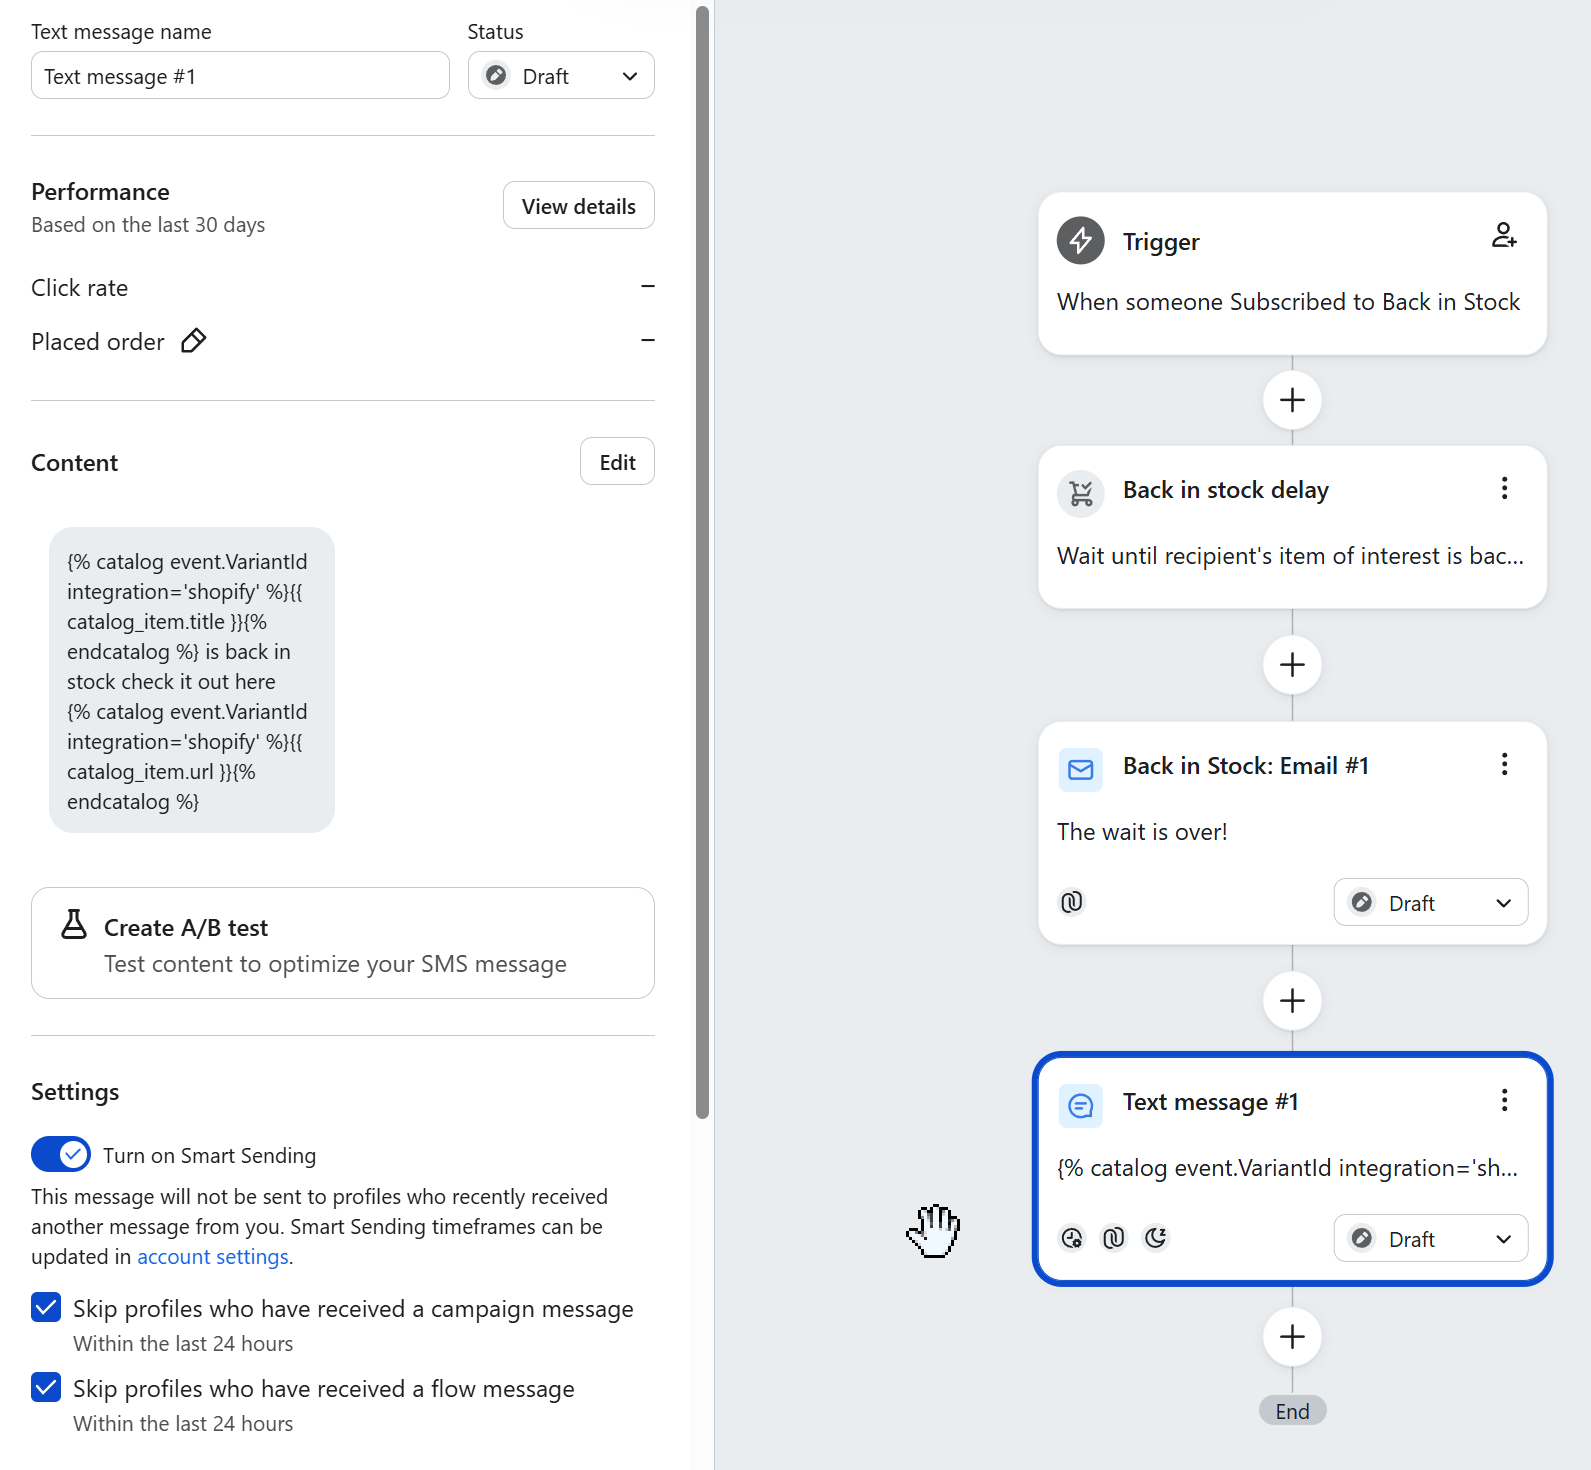 Notify Me will not send any notifications until this flow is live in Klaviyo.
{/* TODO: screenshot — Bloom Design page with brand colours applied */}
Bloom does not display on gift card products.
Pricing, free trial, and what happens if your plan expires: see [Plans and billing](/bloom/plans-and-billing).
Notify Me will not send any notifications until this flow is live in Klaviyo.
{/* TODO: screenshot — Bloom Design page with brand colours applied */}
Bloom does not display on gift card products.
Pricing, free trial, and what happens if your plan expires: see [Plans and billing](/bloom/plans-and-billing).